xcodelovers
Just Sharing Knowledge
Tutorial integrating Code::Blocks and OpenCV 2.1.0
Posted by on February 3, 2011
In this tutorial, we will learn about “how to integrate Code::Blocks and OpenCV 2.1.0”. For OpenCV 2.2.0, please see my other tutorial about “Tutorial integrating Code::Blocks and OpenCV 2.2.0”.
You must have OpenCV 2.1.0 and Code::Blocks installed on your system. If you don’t have it, please see my other tutorial how to installing them in this blog.
Ok, lets jump to the tutorial step.
- We assume that you have installed opencv and codeblocks on your computer. So ,we jump to the next step.
- Run Code::Blocks and select on the menu “Setting->Compiler and debugger” like image below.
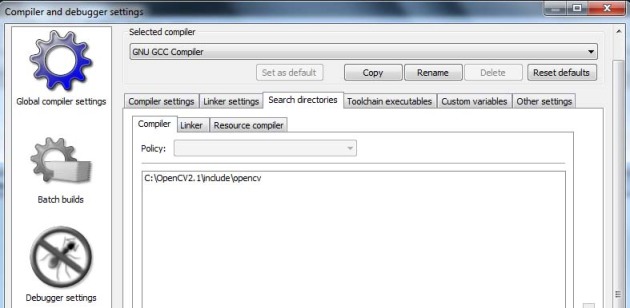
- Next, you will see a dialog for Compiler and debugger settings like image below, on the “search directories” tab select “compiler” tab and add opencv include directory by click “Add” button on the bottom.
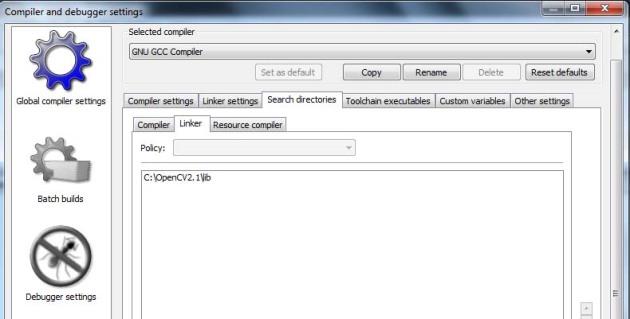
- Next, On the “search directories” tab select “linker” tab and add opencv library directory by click “Add” button on the bottom like image below.
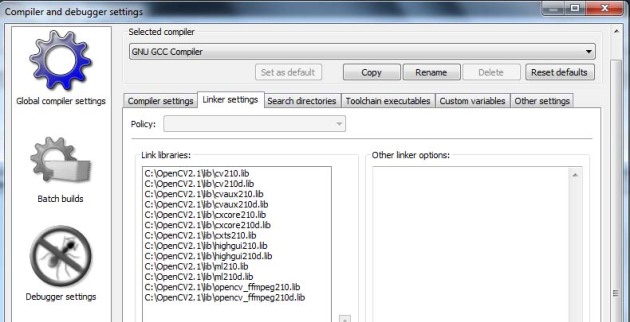
- Next, still on a dialog for Compiler and debugger settings, select “Linker setting” tab and add opencv include file by click “Add” button on the bottom like image below.
- Create New project from menu “File->New->Project”, select “Console Application”, choose C++ project and give project name. Select “GNU GCC Compiler” and click “Finish” button.
- On the left panel expand folder “src” and then open main.cpp. On the code editor put this code bellow.
#include "stdio.h" #include "cv.h" #include "highgui.h" int main(int argc, char** argv) { IplImage *img = cvLoadImage("lena.jpg", CV_LOAD_IMAGE_COLOR); /* initialize font and add text */ CvFont font; cvInitFont(&font, CV_FONT_HERSHEY_SIMPLEX, 1.0, 1.0, 0, 1, CV_AA); cvPutText(img, "Hello World!", cvPoint(10, 50), &font, cvScalar(255, 255, 255, 0)); /* display the image */ cvNamedWindow("image", CV_WINDOW_AUTOSIZE); cvShowImage("image", img); cvWaitKey(0); cvDestroyWindow("image"); cvReleaseImage( &img ); return 0; } - Build and run project by press “F9”. (Note: you must put image file on the project folder first and then run project.)
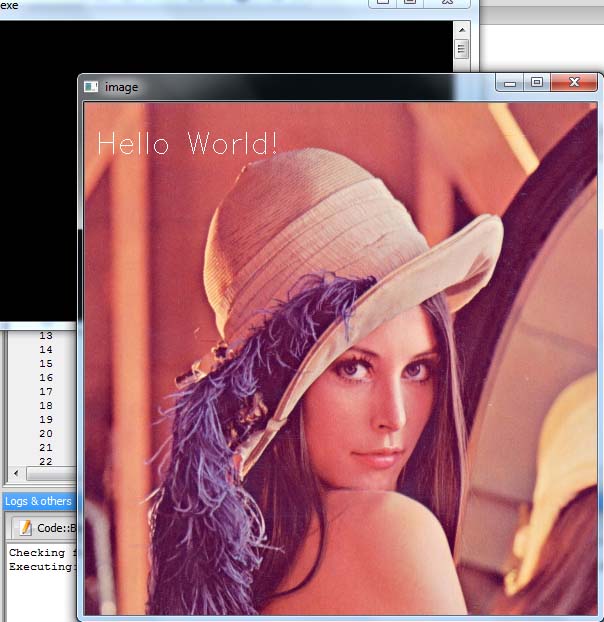
- Then you will see result like image below. Congratulation you are successful integrate Code::Blocks and OpenCV. Have fun…


